5 Ways To Build a Great Looking Bootstrap Contact Form

In this post I’ll briefly introduce the Bootstrap CSS framework and walk you through how to make a range of great looking contact forms.
What is Bootstrap?
Bootstrap is a front-end framework that provides web developers with re-usable components and themes. Bootstrap gives developers layout options that work across browsers and mobile devices. It takes the headache out of building good-looking, mobile-friendly, websites.
We’re going to use Bootstrap to build beautiful, mobile-first contact forms that are perfect for both business and blog owners alike.
Including Bootstrap on Your Site
To include Bootstrap on your site, you’ll need to link Bootstrap’s CSS file in the <head> tag of each page you plan to use Bootstrap on.
In your <head> tag, insert this line:
<link rel="stylesheet" href="https://cdnjs.cloudflare.com/ajax/libs/twitter-bootstrap/4.1.3/css/bootstrap.min.css" />
Contact Form Templates
Contact forms provide an effortless way for users to get in touch with your business, without having to reveal your personal information. On many sites, you’ll find a contact form on their Contact Us page.
Handling Form Submissions
For most business websites it is usually quicker and more reliable to use a third party service to handle form submissions. That way you can easily configure form submission behavior without having to write a bunch of boilerplate code.
In this walkthrough we’ll be using the free 99Inbound Form Endpoint API to handle form submissions so we don’t have to write our own back-end.
Read more about the Form Endpoint API
Simple Contact Form
Let’s build a simple contact form that records a user’s email address and their message to us. This type of contact form is great for blog owners because it is simple to create and easy to fill out.

You will need to grab your Form Endpoint URL and enter it as the action parameter of our <form> tag (be sure to also set the form method to POST).
Then insert this form into the <body> tag of your page.
<div class="container">
  <!-- CHANGE THE URL HERE -->
  <form action="https://app.99inbound.com/e/123" method="POST" target="_blank">
    <h3 style="text-align: center;">Contact Us</h3>

  <div class="form-group">
    <label for="email">Email address</label>
    <input name="email" type="email"  class="form-control" id="email" placeholder="Enter email" required>
   </div>

  <div class="form-group">
    <label for="message">Message</label>
    <textarea name="message" class="form-control" id="message" rows="5" placeholder="Enter message" required></textarea>
  </div>

  <button type="submit" class="btn btn-primary float-right">Submit</button>
  </form>
</div>
In the contact form shown above, we are specifying field types and using HTML5’s validation feature to note that a field is required. This will hand-off form validation to the user’s browser without any additional JavaScript. This way, form validation will happen in a native and standardized fashion, which means less surprises for users.
If any input field isn’t required on your page, simply remove the required parameter to allow the form to accept an empty value.
For example, if you want to receive messages even if the user doesn’t provide their email address, simply removing required from the email field in the contact form allows you to do that.
   <input name="email" type="email"  class="form-control" id="email" placeholder="Enter email">
   <!-- See, not required any more -->
Contact Form with Name and Icons
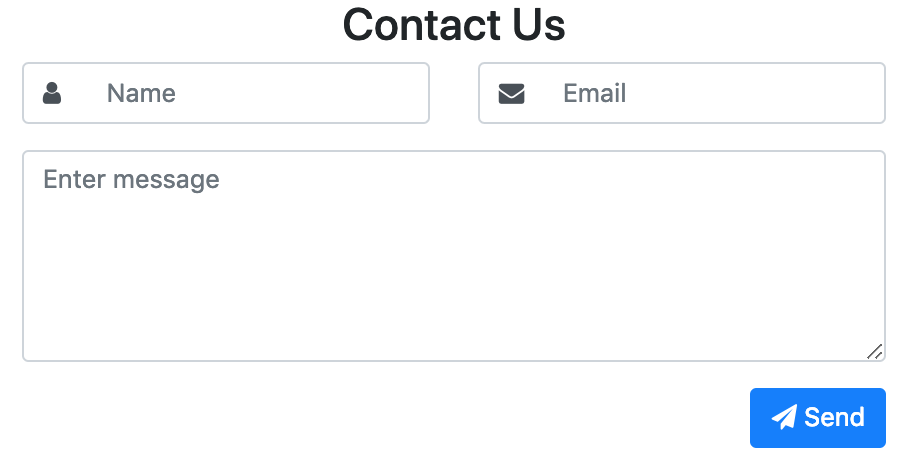
Perhaps you want to create a more formal relationship with users by asking them for their name, as well as their email address. We can also include icons to create a professional-looking user experience.
![]()
We’ll use the Font Awesome iconset to add icons this our form fields. In your <head> tag, include the Font Awesome CSS:
<link rel='stylesheet' href="https://cdnjs.cloudflare.com/ajax/libs/font-awesome/4.7.0/css/font-awesome.min.css" />Again, make sure you’ve grabbed your Form Endpoint URL to insert into the <form> tag as an action parameter.
<div class="container">
<form action="https://app.99inbound.com/e/123" method="POST" target="_blank">
<h3 style="text-align: center;">Contact Us</h3>
<div class="form-group">
<div class="input-group">
<div class="input-group-prepend">
<span class="input-group-text bg-white">
<i class="fa fa-user"></i> 
</span>
</div>
<input name="name" type="name" placeholder="Name" class="form-control border-left-0" required>
</div>
</div>
<div class="form-group">
<div class="input-group">
<div class="input-group-prepend">
<span class="input-group-text bg-white">
<i class="fa fa-envelope"></i>
</span>
</div>
<input name="email" type="email" placeholder="Email" class="form-control border-left-0" required>
</div>
</div>
<div class="form-group">
<textarea class="form-control" id="message" rows="5" placeholder="Enter message" required></textarea>
</div>
<button type="submit" class="btn btn-primary float-right">
<i class="fa fa-paper-plane"></i>
Send
</button>
</form>
</div>
Inline Contact Form
As we add fields to our form, it can elongate the page and overwhelm visitors. A compact form that takes advantage of horizontal space can provide a streamlined experience to our users.
Using Bootstrap’s form grid, we can inline some of our form’s fields. By using Bootstrap’s row and col classes, we can create a row with two columns, where one column holds our name-field and the other holds our email-field.
Let’s take a look at how we’d build this form. Make sure you have your Form Endpoint URL on hand.
<div class="container">
<!-- Add your own form endpoint URL here -->
<form action="https://app.99inbound.com/e/123" method="POST" target="_blank">
<h3 style="text-align: center;">Contact Us</h3>
<div class="row">
<div class="col">
<div class="form-group">
<div class="input-group">
<div class="input-group-prepend">
<span class="input-group-text bg-white">
<i class="fa fa-user"></i> 
</span>
</div>
<input name="name" type="name" placeholder="Name" class="form-control border-left-0" required>
</div>
</div>
</div>
<div class="col">
<div class="form-group">
<div class="input-group">
<div class="input-group-prepend">
<span class="input-group-text bg-white">
<i class="fa fa-envelope"></i>
</span>
</div>
<input name="email" type="email" placeholder="Email" class="form-control border-left-0" required>
</div>
</div>
</div>
</div>
<div class="form-group">
<textarea class="form-control" id="message" rows="5" placeholder="Enter message" required></textarea>
</div>
<button type="submit" class="btn btn-primary float-right">
<i class="fa fa-paper-plane"></i>
Send
</button>
</form>
</div>
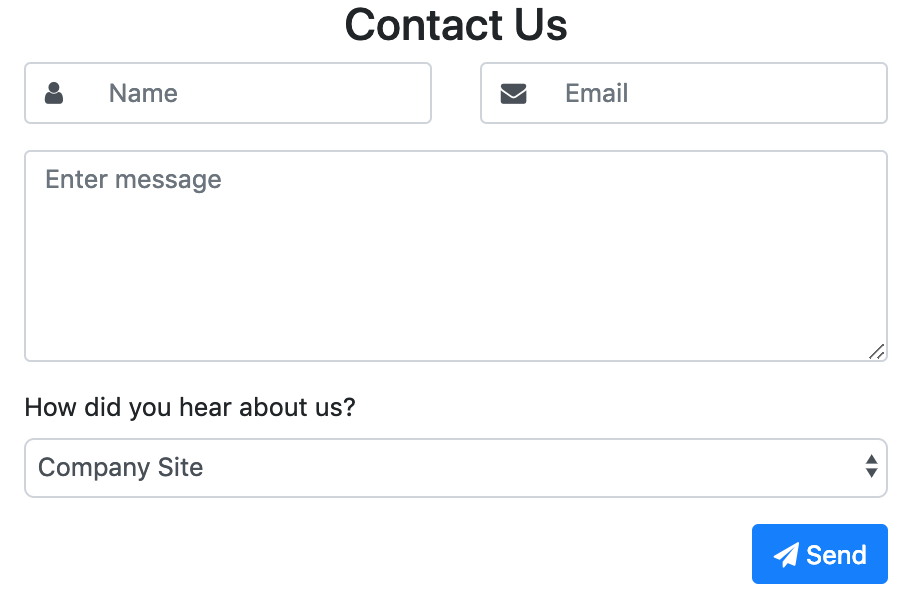
A Contact Form With Some Drop Down Options
Often, it’s valuable to know how a user found your site, especially if you have marketing funnel expenses. While analytics software can help you track some of that information, it doesn’t paint the whole picture. Why not ask the user how they found your site?
As in the other sections, we’ll wire our Form Endpoint URL into our <form> tag.
<div class="container">
<!-- replace with your endoint URL -->
<form action="https://app.99inbound.com/e/123" method="POST" target="_blank">
<h3 style="text-align: center;">Contact Us</h3>
<div class="row">
<div class="col">
<div class="form-group">
<div class="input-group">
<div class="input-group-prepend">
<span class="input-group-text bg-white"><i class="fa fa-user"></i> </span>
</div>
<input name="name" type="name" placeholder="Name" class="form-control border-left-0" required>
</div>
</div>
</div>
<div class="col">
<div class="form-group">
<div class="input-group">
<div class="input-group-prepend">
<span class="input-group-text bg-white"><i class="fa fa-envelope"></i></span>
</div>
<input name="email" type="email" placeholder="Email" class="form-control border-left-0" required>
</div>
</div>
</div>
</div>
<div class="form-group">
<textarea class="form-control" id="message" rows="5" placeholder="Enter message" required></textarea>
</div>
<div class="form-group">
<label for="dropdown">How did you hear about us?</label>
<select name="heard_about_us_on" class="form-control" id="dropdown" required>
<option>Company Site</option>
<option>Google</option>
<option>Bing</option>
<option>Angel.co</option>
<option>Other...</option>
</select>
</div>
<button type="submit" class="btn btn-primary float-right">
<i class="fa fa-paper-plane"></i>
Send
</button>
</form>
</div>
Contact Form With Radio Control
Nobody likes unsolicited emails or phone calls. Although our form collects an email address, some users will want to specify how they’d like to be contacted, such as through email or via a phone call.
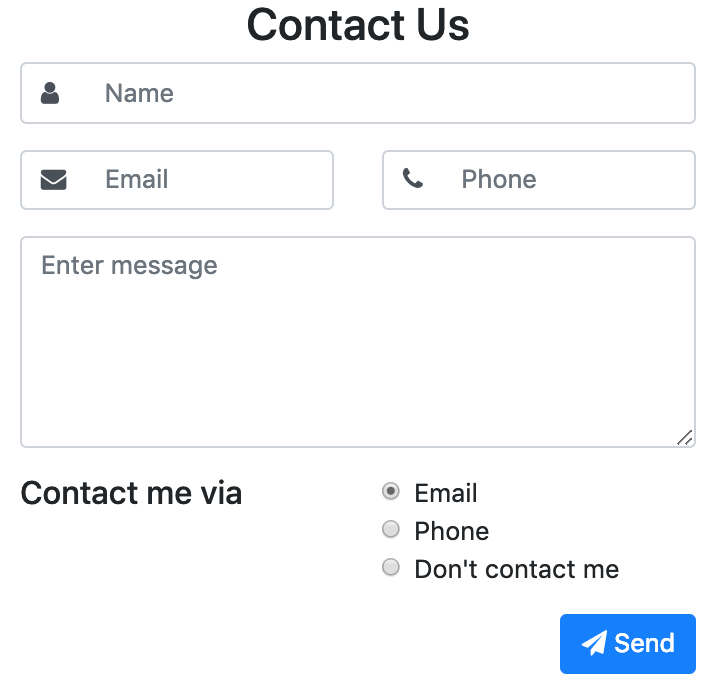
Using our form, we can directly ask users how they’d like to be contacted. To do so, we’ll use radio controls.
To complete the form below, make sure you have a copy of your Form Endpoint URL.
<div class="container">
<!-- replace with your endoint URL -->
<form action="https://app.99inbound.com/e/123" method="POST" target="_blank">
<h3 style="text-align: center;">Contact Us</h3>
<div class="form-group">
<div class="input-group">
<div class="input-group-prepend">
<span class="input-group-text bg-white"><i class="fa fa-user"></i> </span>
</div>
<input name="name" type="text" placeholder="Name" class="form-control border-left-0" required>
</div>
</div>
<div class="row">
<div class="col">
<div class="form-group">
<div class="input-group">
<div class="input-group-prepend">
<span class="input-group-text bg-white"><i class="fa fa-envelope"></i></span>
</div>
<input name="email" type="email" placeholder="Email" class="form-control border-left-0" required>
</div>
</div>
</div>
<div class="col">
<div class="form-group">
<div class="input-group">
<div class="input-group-prepend">
<span class="input-group-text bg-white"><i class="fa fa-phone"></i></span>
</div>
<input name="phone" type="tel" placeholder="Phone" class="form-control border-left-0" required>
</div>
</div>
</div>
</div>
<div class="form-group">
<textarea class="form-control" id="message" rows="5" placeholder="Enter message" required></textarea>
</div>
<div class="form-group">
<fieldset>
<div class='row'>
<div class="col">
<legend><h5>Contact me via</h5></legend>
</div>
<div class="col">
<div class="form-check form-check">
<input class="form-check-input" type="radio" name="byemail" id="byemail" value="email" checked>
<label class="form-check-label" for="byemail">Email</label>
</div>
<div class="form-check form-check">
<input class="form-check-input" type="radio" name="byphone" id="byphone" value="phone">
<label class="form-check-label" for="phone">Phone</label>
</div>
<div class="form-check form-check">
<input class="form-check-input" type="radio" name="dont" id="dont" value="dont">
<label class="form-check-label" for="dont">Don't contact me</label>
</div>
</div>
</div>
</fieldset>
</div>
<button type="submit" class="btn btn-primary float-right">
<i class="fa fa-paper-plane"></i>
Send
</button>
</form>
</div>
Wrap Up
It should always be easy for a customer to get in touch with a business owner or representative. Contact forms provide users with a simple communication method, and as business owners we don’t have to paste our email address all over our websites.
Using Bootstrap, we saw how quickly we could build different contact forms that are both beautiful and suitable for a variety of different business needs.
If you are building a form and need a free, reliable backend to process your form submissions you should check out the 99Inbound Form Endpoint API